

How to Create and Debug a Plugin in NopCommerce 4.40
In this article, learn the steps to create a plugin in nopCommerce 4.40 and how to debug, install, uninstall, and prepare the nopCommerce plugin.


Introduction
In this article, I will share the steps to create a plugin in nopCommerce 4.40 including debugging of plugin install-uninstall and PreparePluginToUninstall methods. To demonstrate this, I am using the visual studio 2019 version 16.9.0. NopCommerce 4.40 has been upgraded to .NET 5 & C# 9 and many other features.
In this article, I will create a simple plugin with the install-uninstall without any other features. But, it's better to understand how the nopCommerce plugin is working and how you can debug the install-uninstall method of nopCommerce. This is because if you're going to directly develop features, it will create a small problem. So, better we understand it first. Otherwise, you are maybe facing issues like I made a change in my HTML view, but you won't see the impact on-page.
Create a Plugin From Scratch in Nopcommerce 4.40
Here, I will show you how to create a plugin in nopCommerce 4.40 from scratch. You can check the steps to create a plugin in the nopCommcer developer guide.
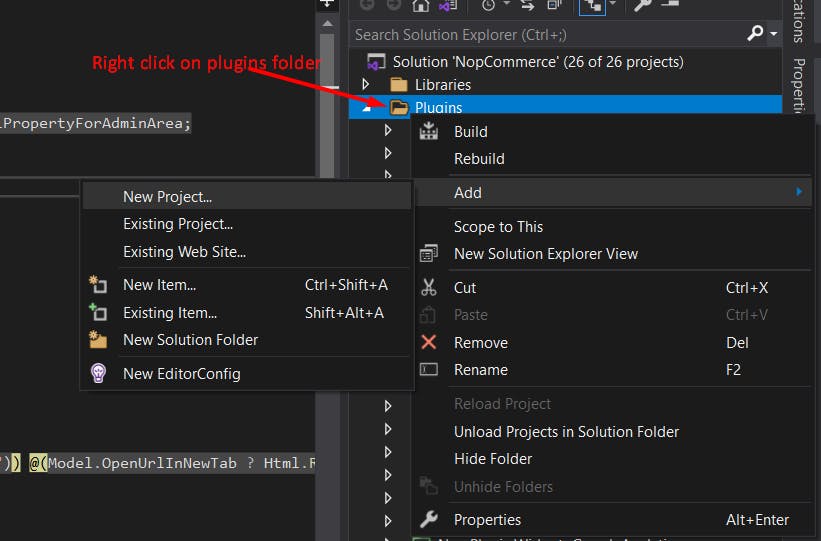
First, right-click on the plugins folder and click on add new class library.
 Then, select the class library from the list of options.
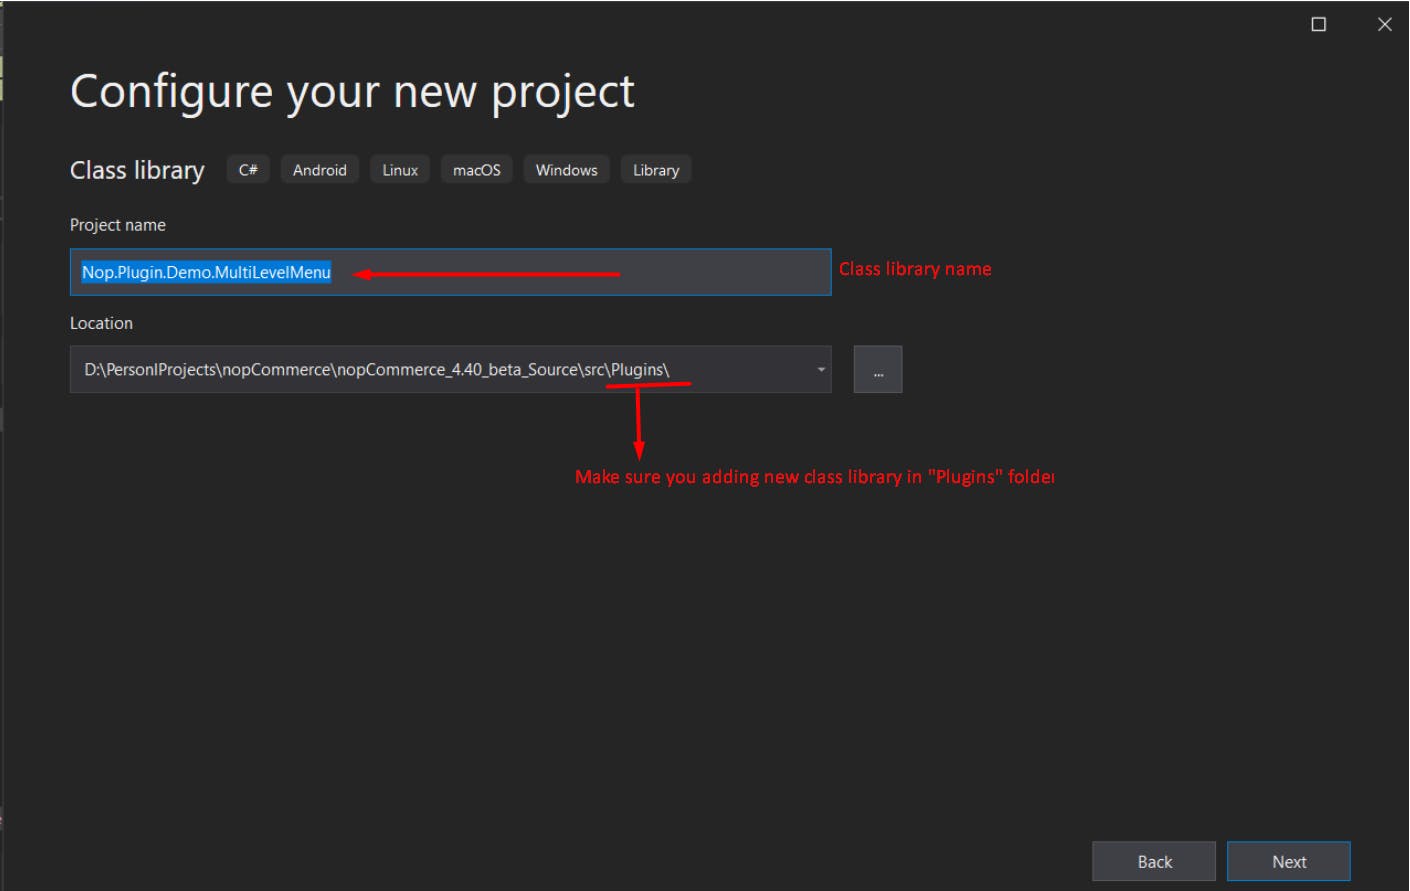
 Now, specify the class library name (the plugin library name. e.g Nop.Plugin.{Group}.{Name}). Note: Make sure you select the location of this class library in the "Plugins" folder of nopCommerce.
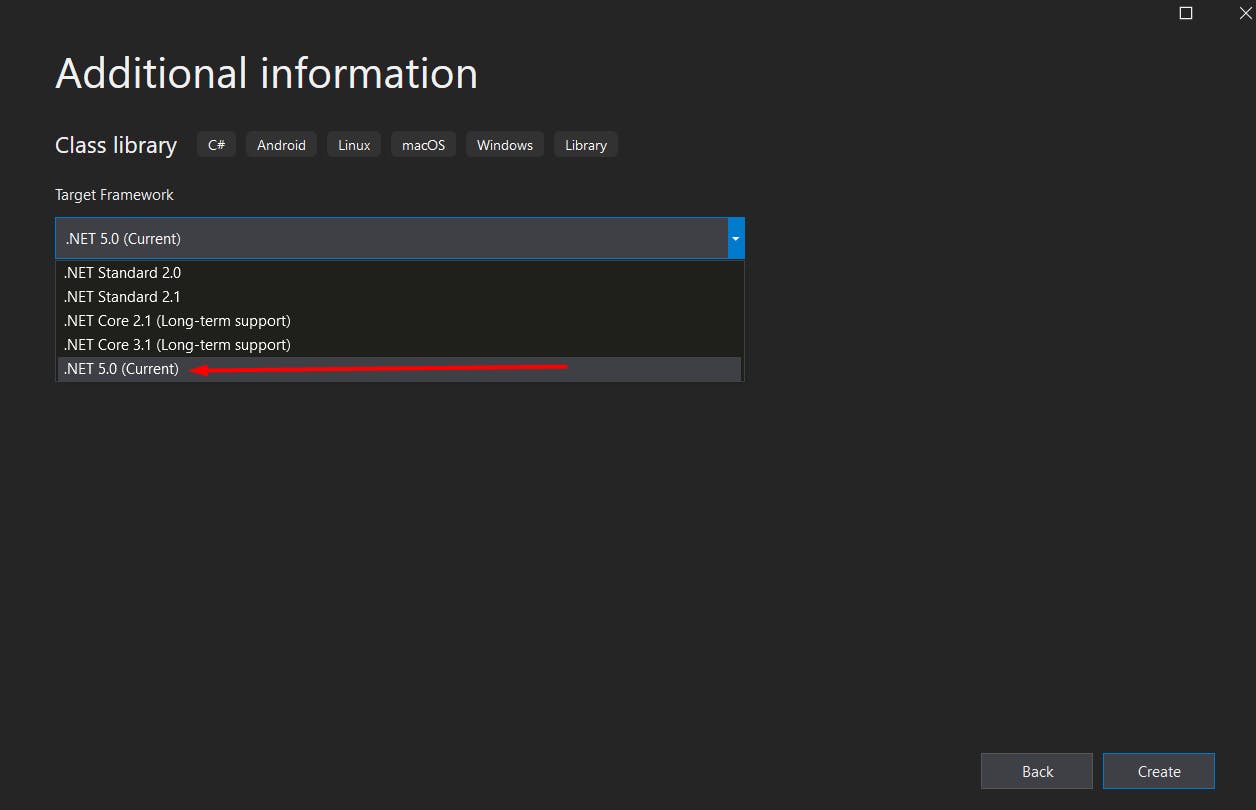
 Next, select target freamwork .NET 5.0
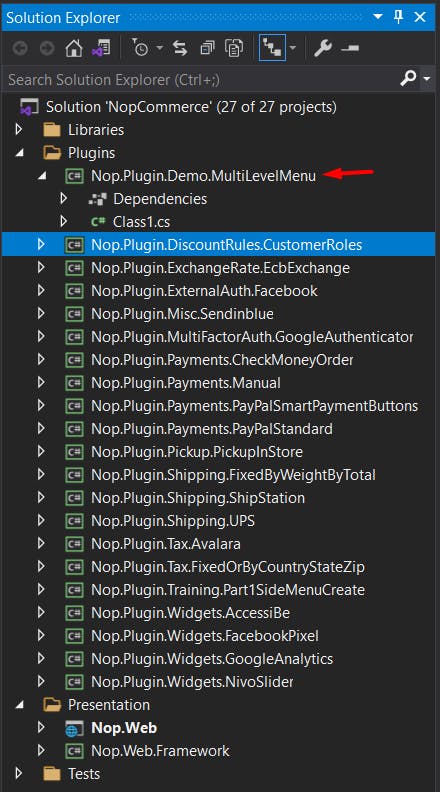
 Now, click on the Next button and the class library added successfully. Please make sure your plugin (Class library) added at the right place. After adding the plugin it will display as follows:
 Now, we will need to edit the project file of the newly created class library (Plugin) Nop.Plugin.Demo.MultiLevelMenu. To edit the project file, right-click on Nop.Plugin.Demo.MultiLevelMenu class library and click on Edit Project File. Right now, the project file looks like the following.
<Project Sdk="Microsoft.NET.Sdk">
  <PropertyGroup>
    <TargetFramework>net5.0</TargetFramework>
  </PropertyGroup>
</Project>
You need to edit the project file of the Nivo slide plugin because, from the Nivo slider, we will copy a few things from the project file. We will copy some tags from it and put them into our project file. Let's first check what it looks like after copying the tag from the Nivo slide. Later, will see the importance of it.
<Project Sdk="Microsoft.NET.Sdk">

  <PropertyGroup>
    <TargetFramework>net5.0</TargetFramework>

    <OutputPath>..\..\Presentation\Nop.Web\Plugins\Demo.MultiLevelMenu</OutputPath>
    <OutDir>$(OutputPath)</OutDir>
    <!--Set this parameter to true to get the dlls copied from the NuGet cache to the output of your project.
    You need to set this parameter to true if your plugin has a nuget package
    to ensure that the dlls copied from the NuGet cache to the output of your project-->
    <CopyLocalLockFileAssemblies>false</CopyLocalLockFileAssemblies>

  </PropertyGroup>

  <ItemGroup>
    <ProjectReference Include="..\..\Presentation\Nop.Web.Framework\Nop.Web.Framework.csproj" />
    <ClearPluginAssemblies Include="$(MSBuildProjectDirectory)\..\..\Build\ClearPluginAssemblies.proj" />
  </ItemGroup>

  <!-- This target execute after "Build" target -->
  <Target Name="NopTarget" AfterTargets="Build">
    <!-- Delete unnecessary libraries from plugins path -->
    <MSBuild Projects="@(ClearPluginAssemblies)" Properties="PluginPath=$(MSBuildProjectDirectory)\$(OutDir)" Targets="NopClear" />
  </Target>

</Project>
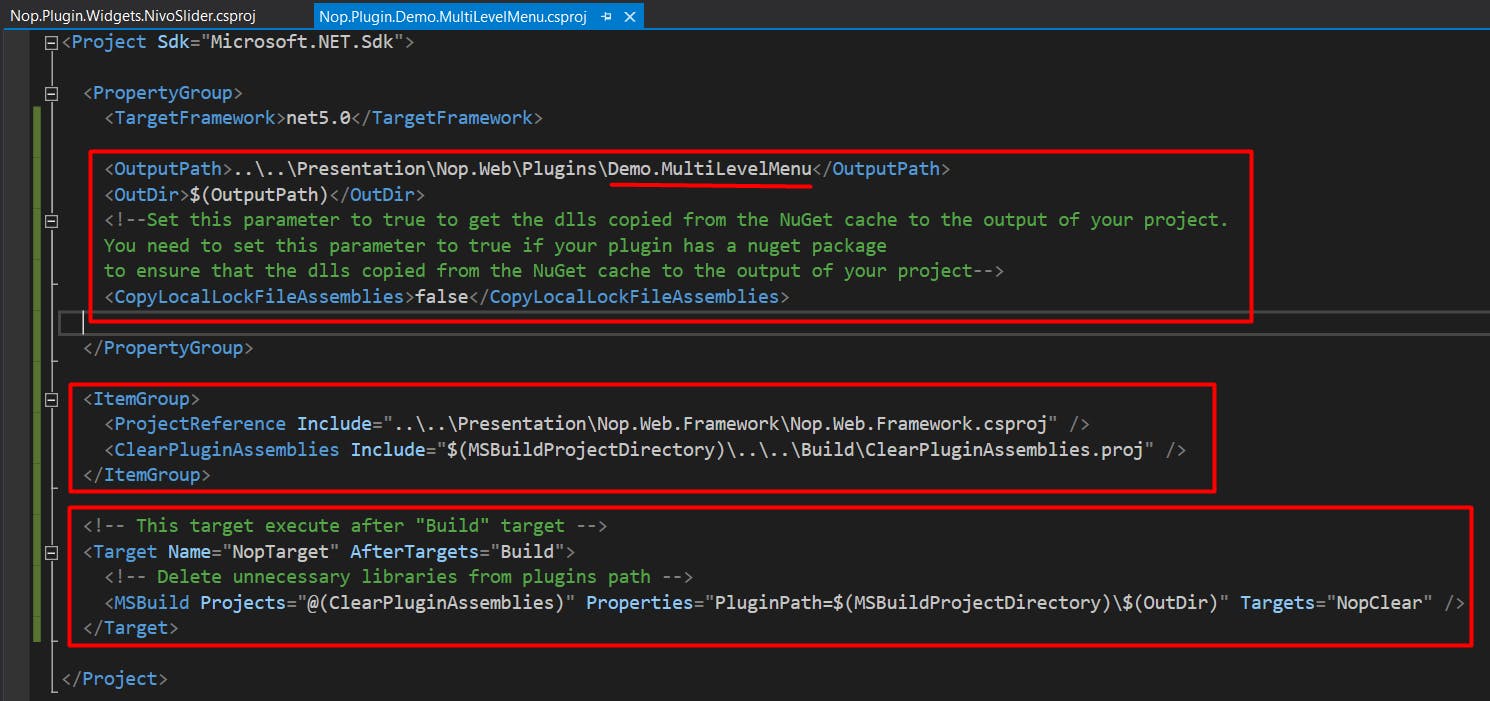 Whenever we build a nopCommerce plugin (class library). It will copy a file like cshtml, CSS, js, etc. The file will be copied on the location specified in the OutputPath tag. We take Demo.MultiLevelMenu, which means {GroupName}.{PluginName}. So, this folder will be created at the build time, and we can see our plugin DLL, as well as static content like .json, .cshtml, js, CSS, images, etc.
First, ItemGroup is adding a reference of Nop.Web.Framework.csproj and ClearPluginAssemblies.proj. The target tag already has an explanation that you can check in the above screenshot.
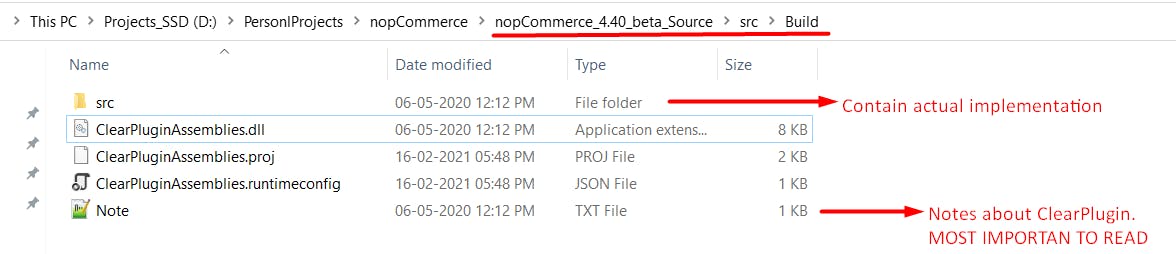
Now, if you saw the nopCommerce solution, then you can check Nop.Web.Framework. But, let me share the location for ClearPluginAssemblies.proj if you want to check what it contains or if you want to check the code of the project. ClearPluginAssemblies.proj is used for following:
- ClearPluginAssemblies.proj file contains preparation steps for deleting unnecessary files.
- ClearPluginAssemblies.dll file contains the code for deleting unnecessary files. This file is compiled from the project code in the src directory.
- If you download the nopCommerce source code, then the Build folder contains the dll of ClearPluginAssemblies. Note.txt file and, then, to check code, you need to go inside the src folder, which is under the Build folder. Below is the screenshot of the folder:
- Now save the edit project file and close it. Now, we will rename the Class1.cs file to MultiLevelMenuPlugin.cs. or you can delete Class1.cs and the new class file. Here, we need to make sure that this file will contain the install-uninstall logic, menu creation, etc. So, it is always preferable to use the name of this file as {PluginName}Plugin.cs.
- Now, we will inherit BasePlugin in MultiLevelMenuPlugin class and override the Install-UnInstall methods.
using System;
using System.Threading.Tasks;
using Nop.Core;
using Nop.Services.Common;
using Nop.Services.Plugins;

namespace Nop.Plugin.Demo.MultiLevelMenu
{
    public class MultiLevelMenuPlugin : BasePlugin, IMiscPlugin
    {
        private readonly IWebHelper _webHelper;

        public MultiLevelMenuPlugin(IWebHelper webHelper)
        {
            _webHelper = webHelper;
        }

        /// <summary>
        /// Gets a configuration page URL.
        /// </summary>
        public override string GetConfigurationPageUrl()
        {
            return $"{_webHelper.GetStoreLocation()}Admin/MultiLevelMenu/Configure";
        }
        public override Task InstallAsync()
        {
            return base.InstallAsync();
        }

        public override Task UninstallAsync()
        {
            return base.UninstallAsync();
        }
        /// <summary>
        /// check order when this executing
        /// </summary>
        /// <returns></returns>
        public override Task PreparePluginToUninstallAsync()
        {
            return base.PreparePluginToUninstallAsync();
        }
    }
}
- InstallAsync(): In this, you can specify in logic what you want to set up, such as adding resources for the label, creating a table structure, adding a scheduler task, etc.
- PreparePluginToUninstallAsync(): In this, you can put "requires some other certain plugins to be uninstalled first" or you can put any custom logic you want to execute. You will get debug when you click on the UnInstall button from the admin local plugin list.
- UninstallAsync(): In this, you can specify things you want to remove when your plugin is uninstalled like after plugin uninstall, you want to remove label resource or if you want to drop table, etc.
- Now, we are adding plugin.json and we need to copy from nivo slider plugin (You can copy from any other plugin no issue) and paste it into our plugin. Then, we will change according to our plugin) file and logo image file in the plugin. More details about plugin.json file structure.
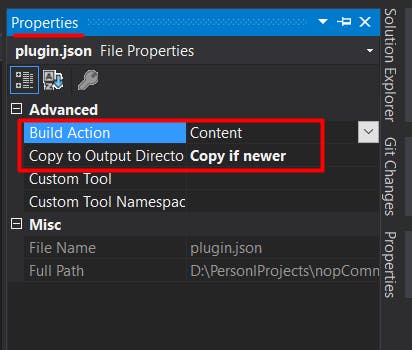
- Here is my Plugin.json file. If you added a new plugin.json file, then make sure you set copy if newer is selected (please check attached screenshot). So, when you build a plugin Plugin.json will be copied to the plugins folder under nop.web. I will be sharing that in the plugin build screenshot.
{
  "Group": "Demo",
  "FriendlyName": "Multi level menu",
  "SystemName": "Demo.MultiLevelMenu",
  "Version": "1.40",
  "SupportedVersions": [ "4.40" ],
  "Author": "keyran joshi",
  "DisplayOrder": 1,
  "FileName": "Nop.Plugin.Demo.MultiLevelMenu.dll",
  "Description": "This plugin create for demo to display multi level menu."
}
 Set this when you want files in the plugins folder under nop.web. files like .js, CSS, cshtml, plugin.json, logo.jpg, etc.
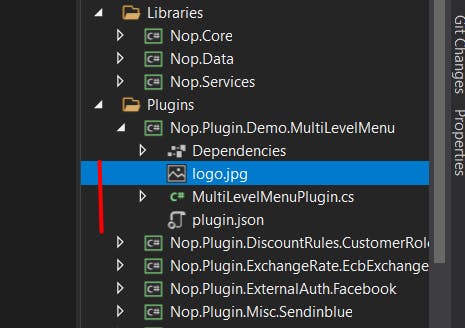
- Now, need to add logo.jpg (make sure you select copy if newer). Now, I am ready to build. So, before that, make sure your plugin solution looks like the following:
- Now, we will build the plugin by right-clicking on the class library and clicking on the build. Once the build is successful, you need to check our plugin is properly built in the nop.web -> plugins folder as the following image:
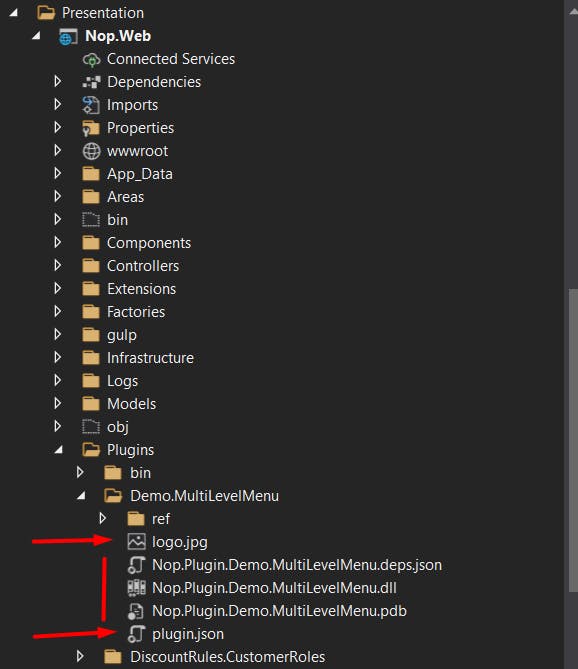 Make sure your files are coming properly like .cshtml, js, etc.
Now, we run our project and check that our plugin is displaying in the admin area.
Debug Plugin Install-UnInstall Method
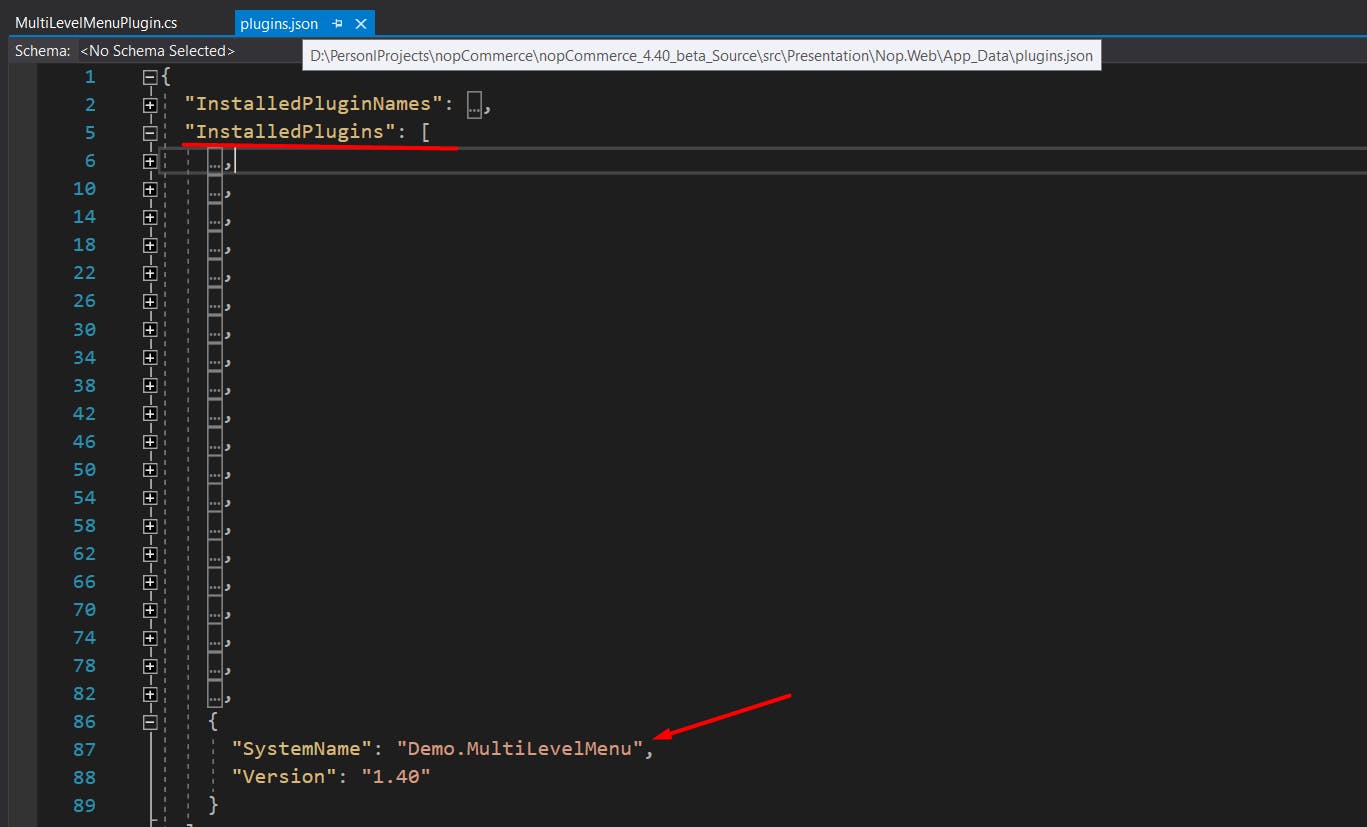
Now, as you saw plugin display in the local plugin list. To debug, put the debug on the Install-Uninstall method of the plugin. When you click on the install button, it will add a plugin system name entry in Presentation\Nop.Web\App_Data\plugins.json
 Now, click on the nopadmin plugin list button and "Restart application to apply changes". It will stop your running visual studio application. Now, ReRun the project without building the plugin or any other thing. You will get debug on your InstallAsync() method of plugin. After debugging is complete, the App_Data plugin.json file InstalledPlugins will contain your plugin name. The from PluginNamesToInstall plugin name entry will be removed.
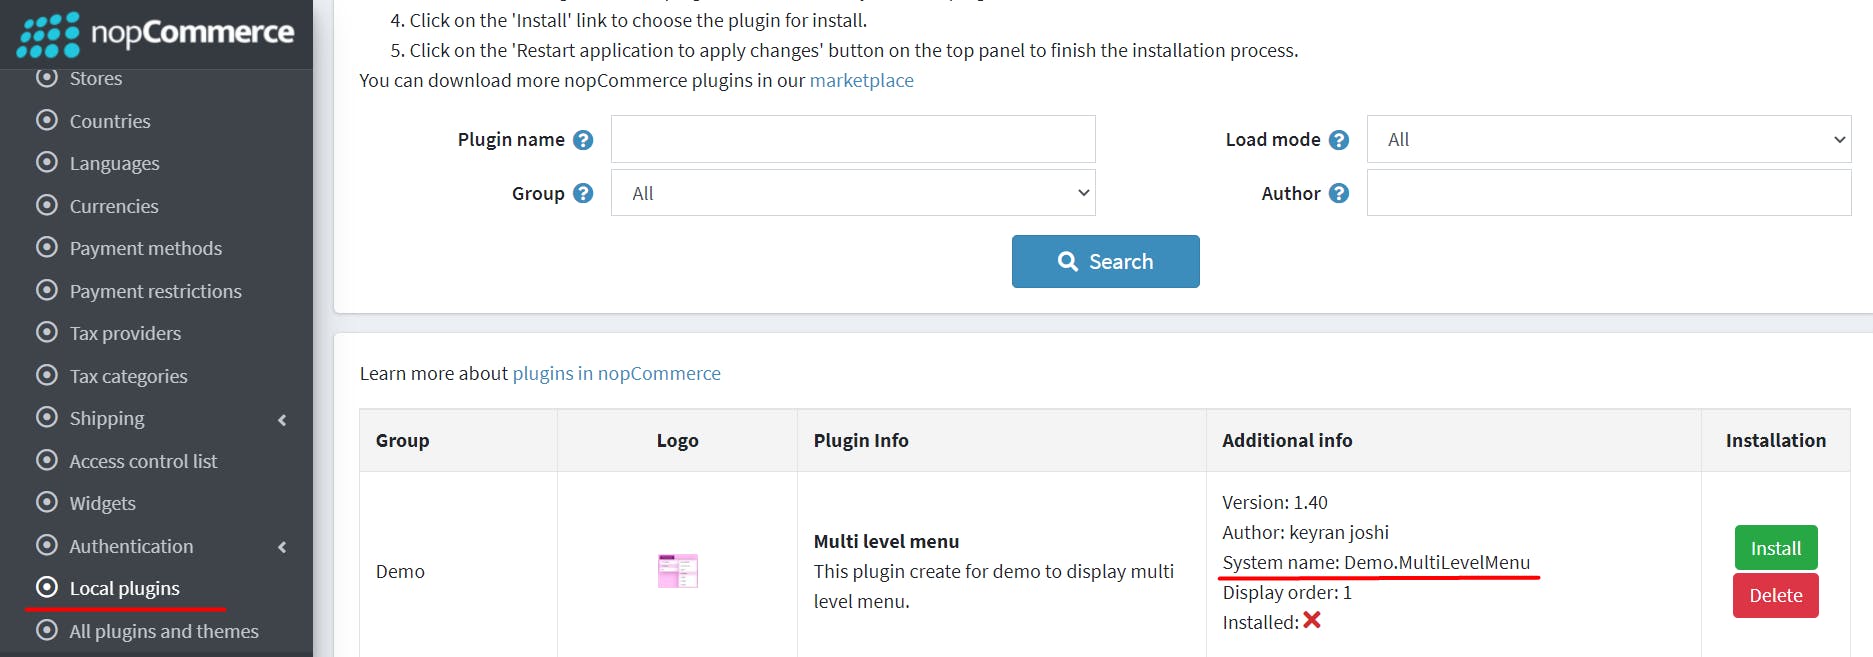
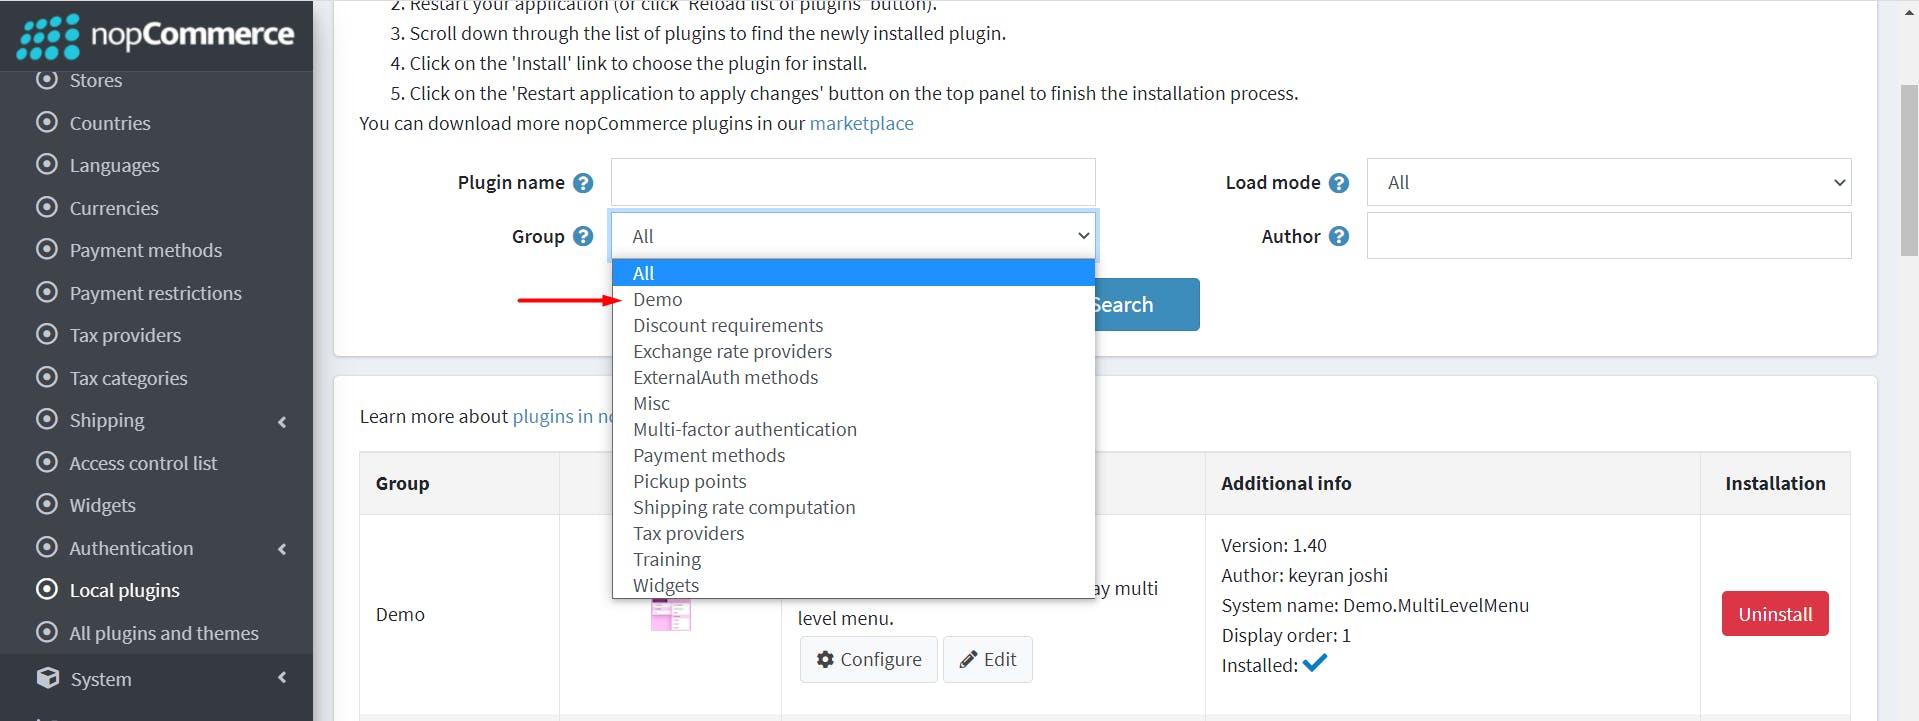
 To verify whether the plugin is installed or not, you can check from the LocalPlugin list from admin. And, we can take the group name "Demo" for this plugin so you can see that in the group filter of the plugin list as the following screenshot:
Next, click on the Uninstall button to uninstall the plugin. When you click on uninstall button, you will get debug on the "PreparePluginToUninstallAsync()" and, then, the plugin name entry will be added in AppData/plugin.json PluginNamesToUninstall and contains the plugin name which will uninstall. Now, click on "Restart application to apply changes " and you will get debug on UninstallAsync().
As you can see, this is a very basic implementation to create a plugin in nopCommerce 4.40 with an understanding of how to debug the install-uninstall method of the nopCommerce plugin. But, this is very important to understand before you start to add features to the plugin because...
“Champions are brilliant at the basics.” — John Wooden
Please let me know your comments on what you would like to add to this article when you go through it.
If you face any problems while you are reading this article, then please mention them in the comments so I can improve it. If you want to see any other articles about nopCommerce, then also let me know in the comments.
Thanks in advance for taking the time to read and make suggestions.